Making an avatar compatible yourself
Before you install
Read Setting up your environment and get the required files installed before putting Satania Tabako on your avatar.
- Adjust with the tool
- Old method
Open the tool
Open さたにあしょっぴんぐ (SataniaShopping) → さたにあ式タバコ (Satania Tabako) → 非対応アバターに対応するツール (Unsupported Avatar Setup Tool) from the menu bar.

You can also open it by right-clicking the avatar in the Hierarchy → さたにあ式タバコ (Satania Tabako) → アバター対応用 (For avatar support) → 非対応アバターに対応するツールを開く (Open the Unsupported Avatar Setup Tool). If an avatar is selected when you open the tool, it is filled into Target Avatar automatically.
The target has to be a Humanoid avatar with a VRC Avatar Descriptor. The tool can't be used in Play Mode.
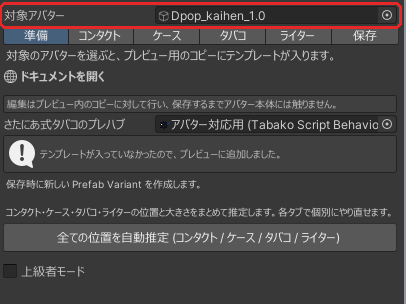
Drag the avatar you want to make compatible from the Hierarchy into Target Avatar.
Press Auto-estimate everything (contacts / case / cigarette / lighter). (You can skip this if you don't need the auto estimation.)
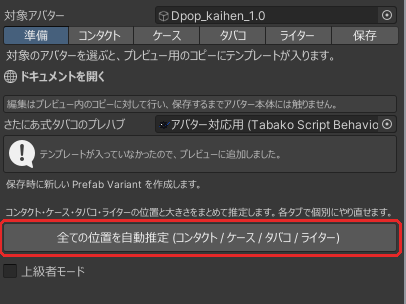
This estimates the position and size of the contacts, case, cigarette and lighter all at once from the avatar's build. From here on, the work is fine-tuning that result tab by tab.
Adjustments are made on a preview copy. The avatar itself isn't touched until you save from the Save tab.
Controls
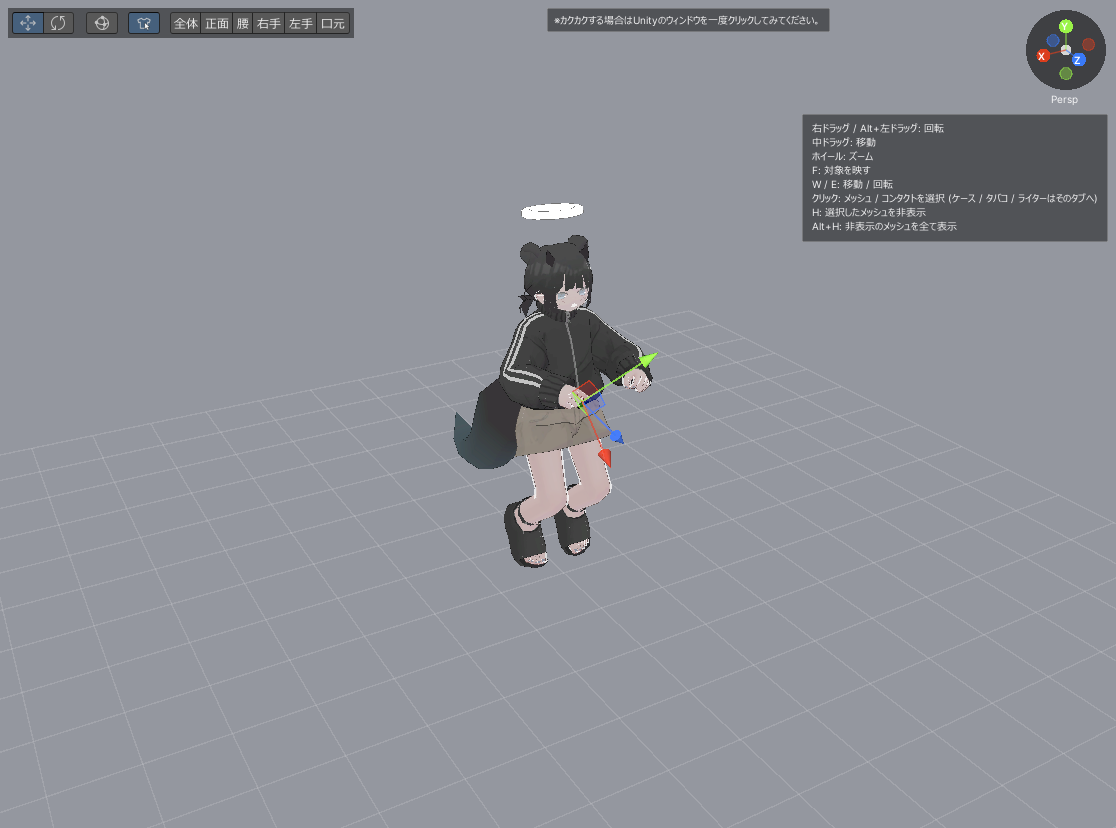
The 3D view on the right (the viewport) works just like the Scene view.
- ・Right drag or Alt + left drag: orbit
- ・Middle drag: pan
- ・Wheel: zoom
- ・F: frame the handle target
- ・W / E: switch between the Move and Rotate tools
- ・Ctrl + Z: undo
Position, rotation, scale, contact shapes, copies and other adjusted values can be undone with Ctrl + Z. Gesture edits, replacing the prefab and hiding meshes can't be undone.
Click the viewport once before using the keys. (After you click anything in the left panel, keyboard focus stays on the panel.)
Hide meshes that get in the way
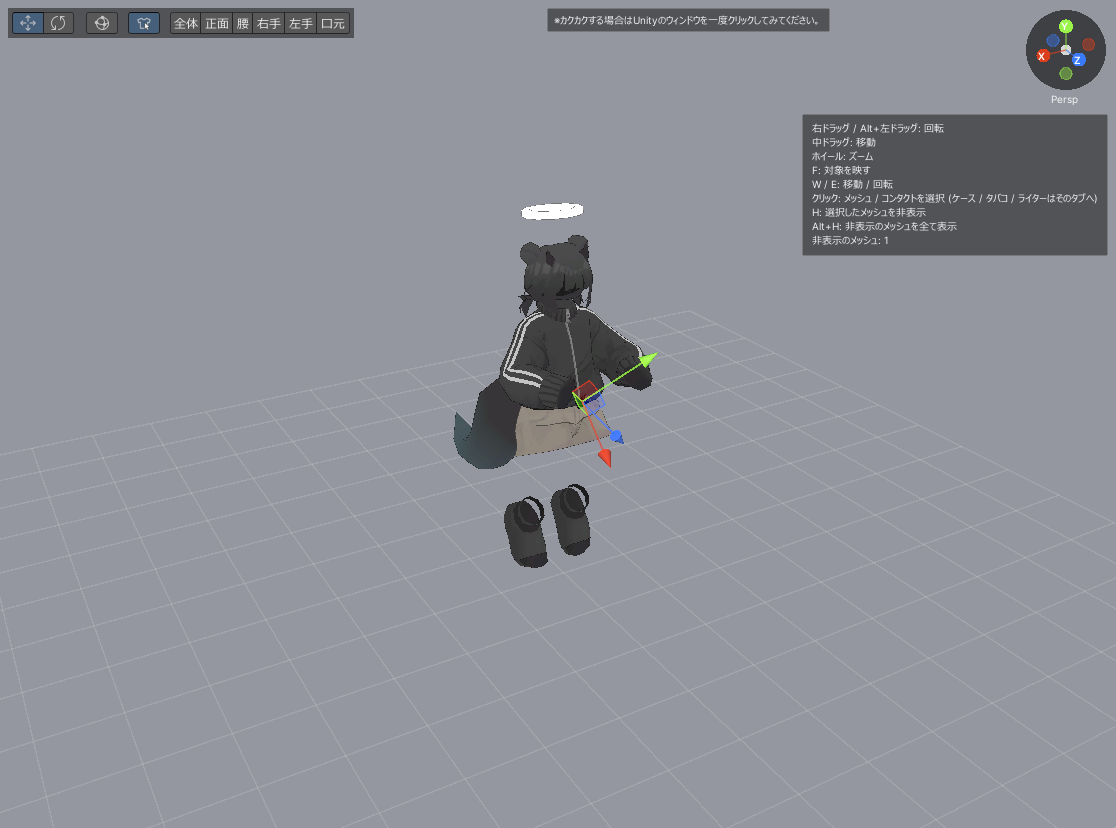
While Mesh selection is on, the mesh under the cursor lights up. Click to select it (a white outline appears), then press H to hide the selected mesh. If nothing is selected, the mesh under the cursor is hidden instead. Press Esc to clear the selection. Use this when hair or clothes get in the way of adjusting. Alt + H brings back every hidden mesh.
Hiding only changes what the preview shows and doesn't affect the saved prefab. The case, cigarette and lighter can't be hidden; clicking them switches to their tab.
Adjust the contacts
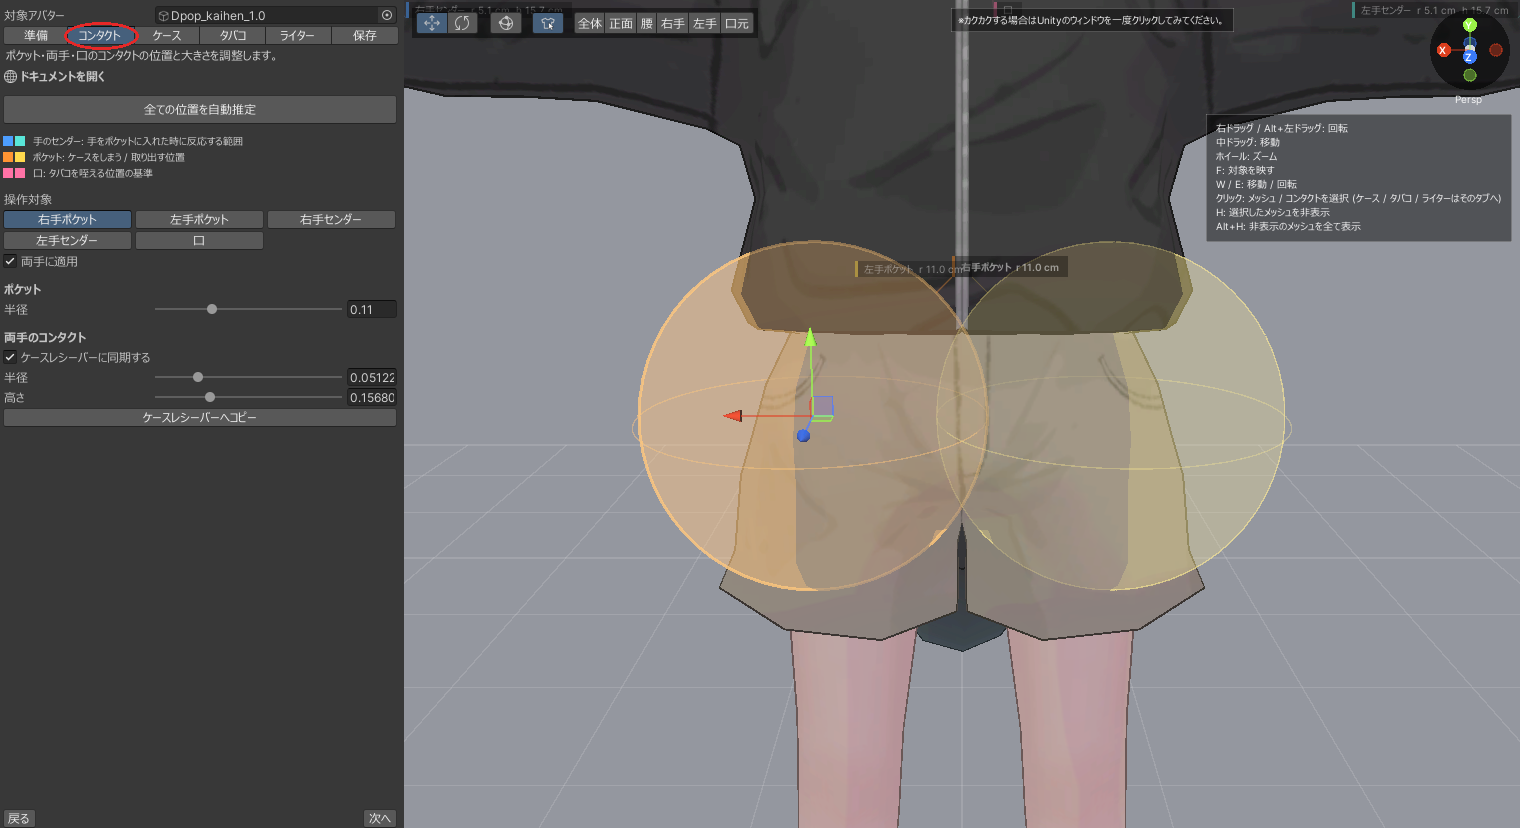
Open the Contacts tab.
There are three kinds of contacts: the pockets you put the case into and take it out of, the hand contacts and the mouth contact.
Press Auto-estimate all positions to estimate the position and size of these contacts.
Adjust the pocket position
Select 右手ポケット (Right hand pocket) or 左手ポケット (Left hand pocket).
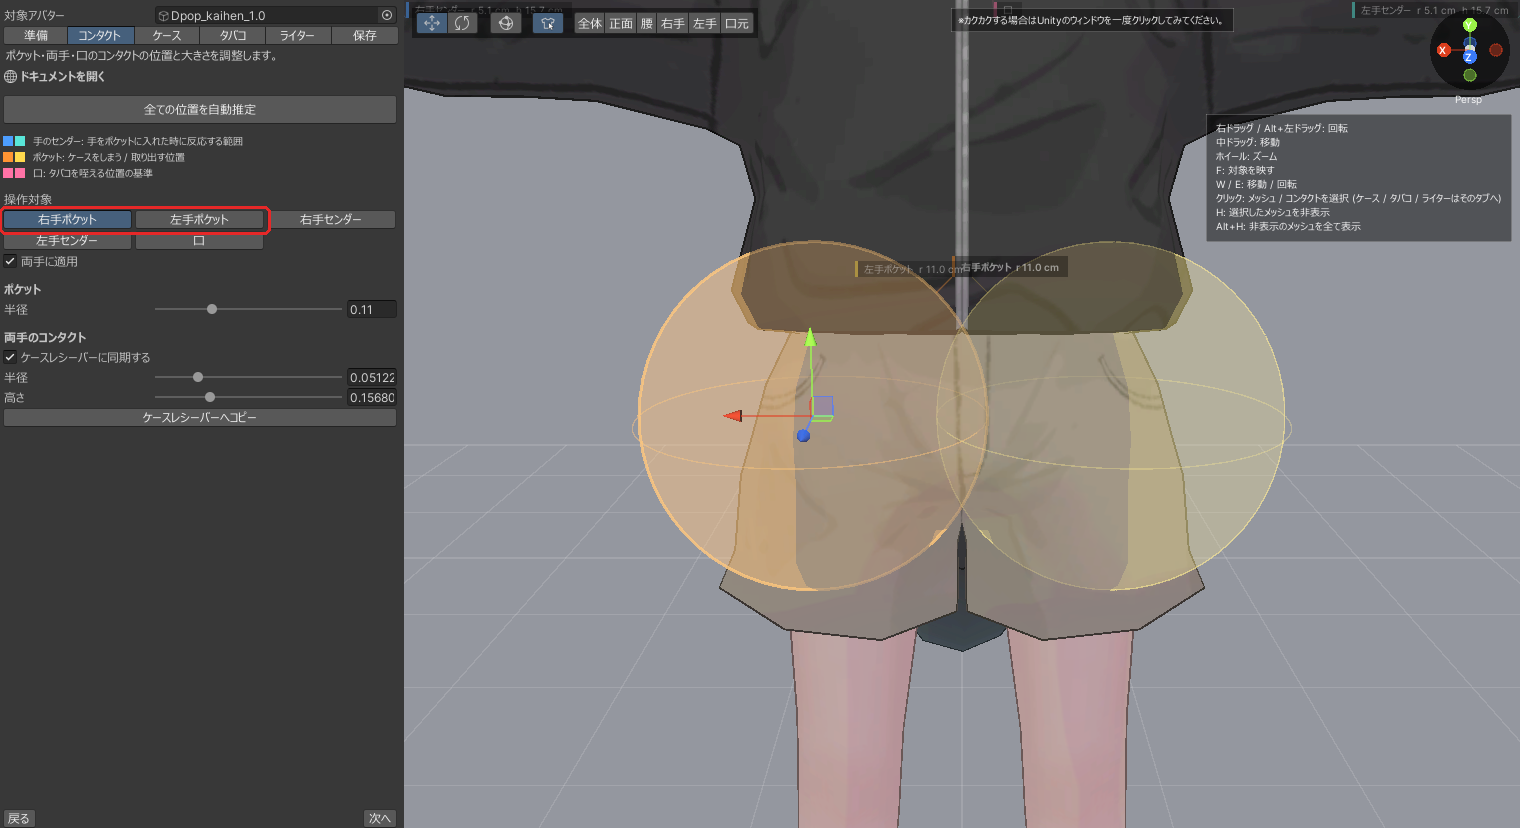
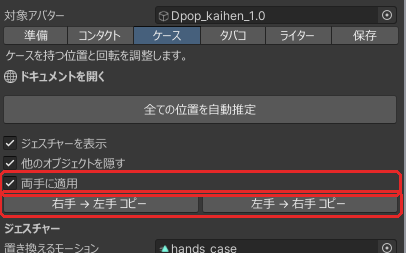
Make sure Apply to Both Hands is on. While it's on, moving one pocket moves the other one with it.

Placing it around belly-button height and, for depth, a little in front of the body's center makes it react more reliably when you put your hand in. Sideways, put it wherever you like. In this example I adjusted it like this.
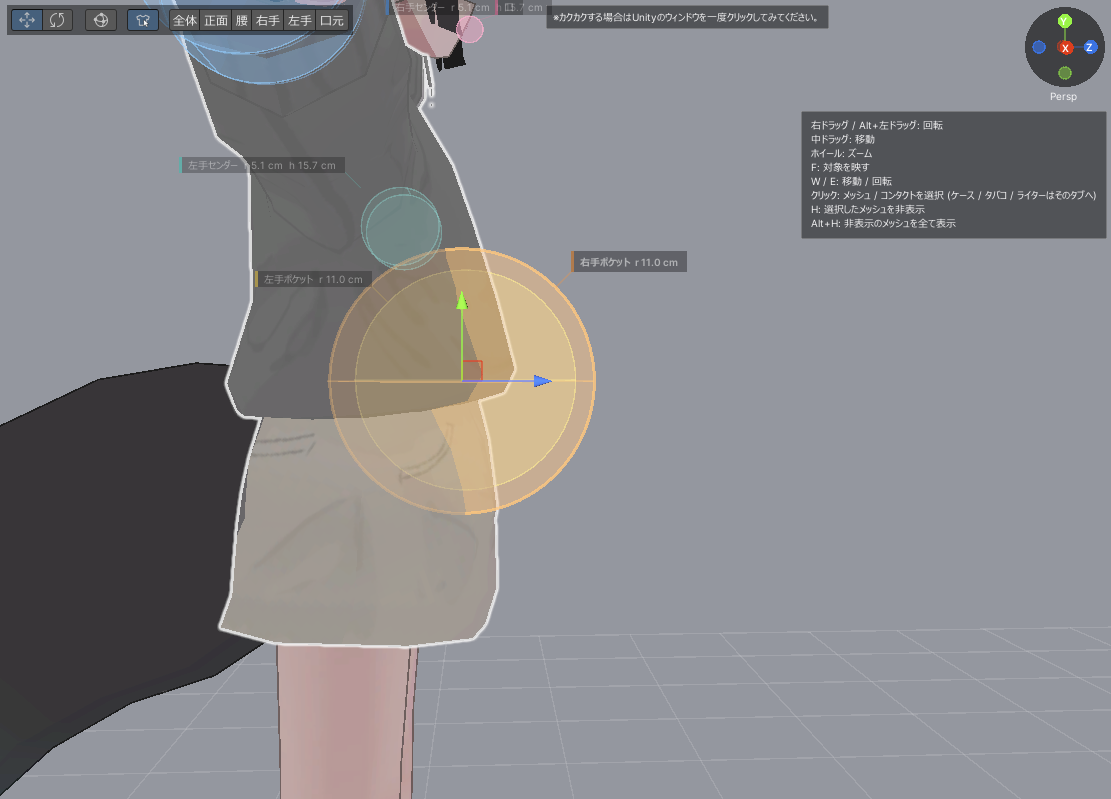
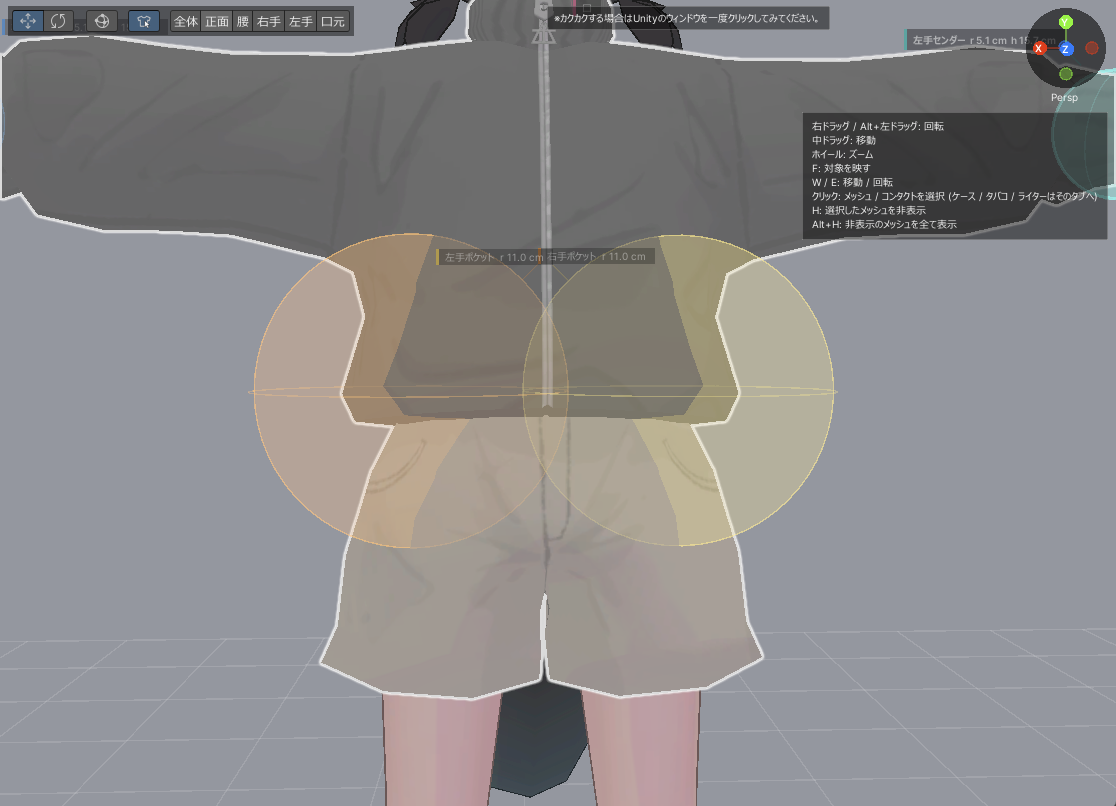
The pocket size can be changed with Radius under Pocket (it applies to both pockets at once).
Adjust the hand contacts
The hand senders are the range that reacts when you put your hand into a pocket.
Select 右手センダー (Right hand sender) under Handle Target and the camera moves to the right hand. (If it doesn't, press Right Hand in the toolbar at the top.)
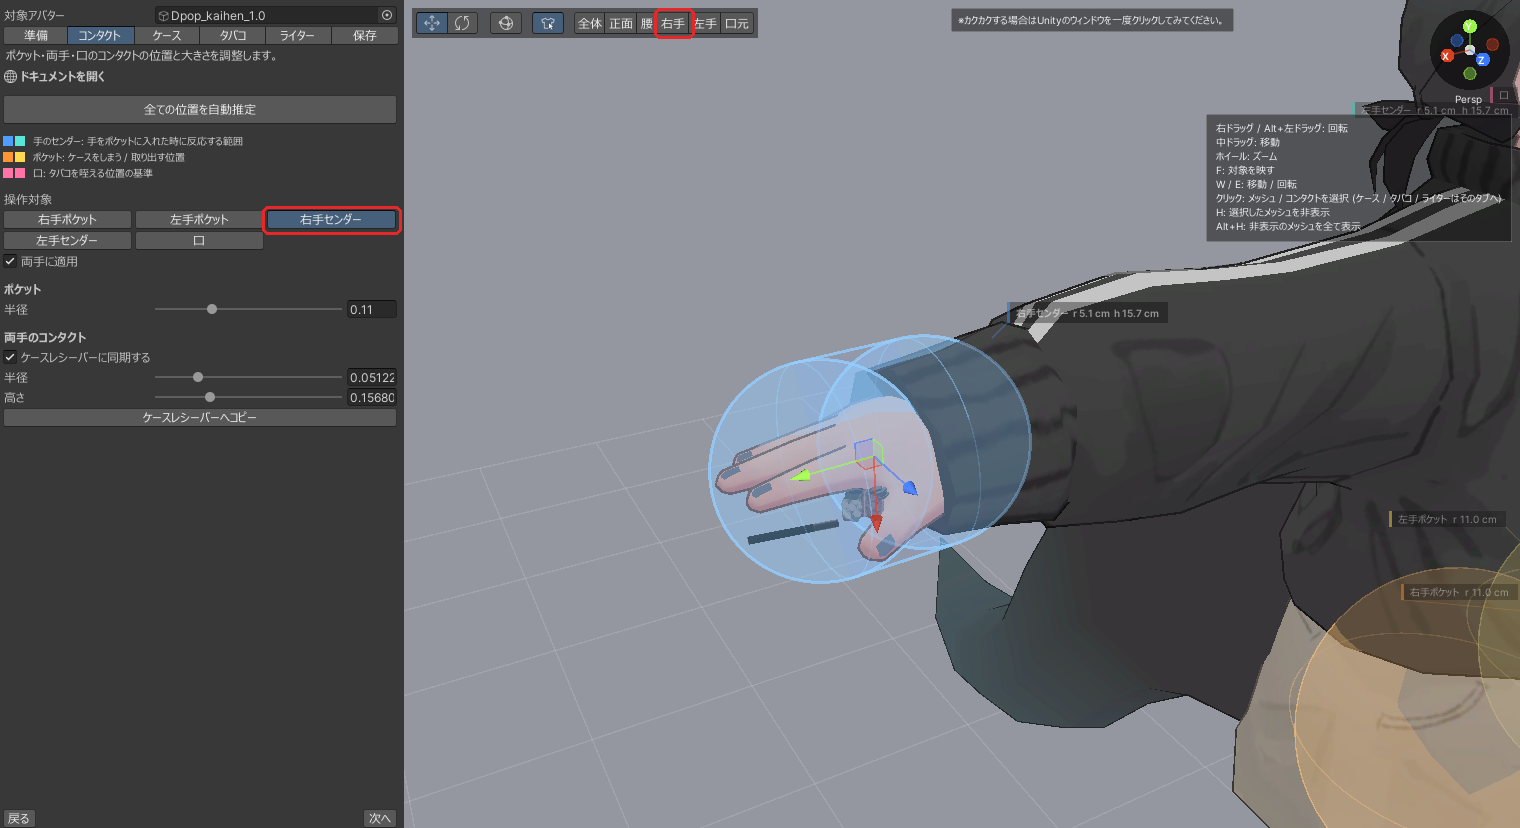
Use the handles to adjust the position and direction so that the capsule overlaps the palm and lies parallel to it. If Apply to Both Hands is on, the left hand sender is mirrored relative to the palm as well. (On avatars without enough finger bones it falls back to a simple mirror based on the hand bone.)
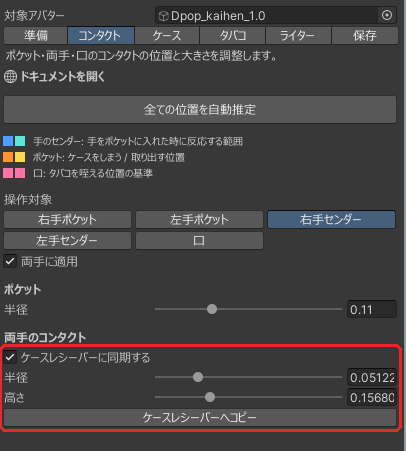
The size can be changed with Radius and Height under Hand Contacts (it applies to both hands at once).
If Sync Case Receivers is on, the contacts on the case side (the case receivers) automatically take the same shape.
If you had it off, press Copy to Case Receivers to match them to the hand senders.
Adjust the mouth contact
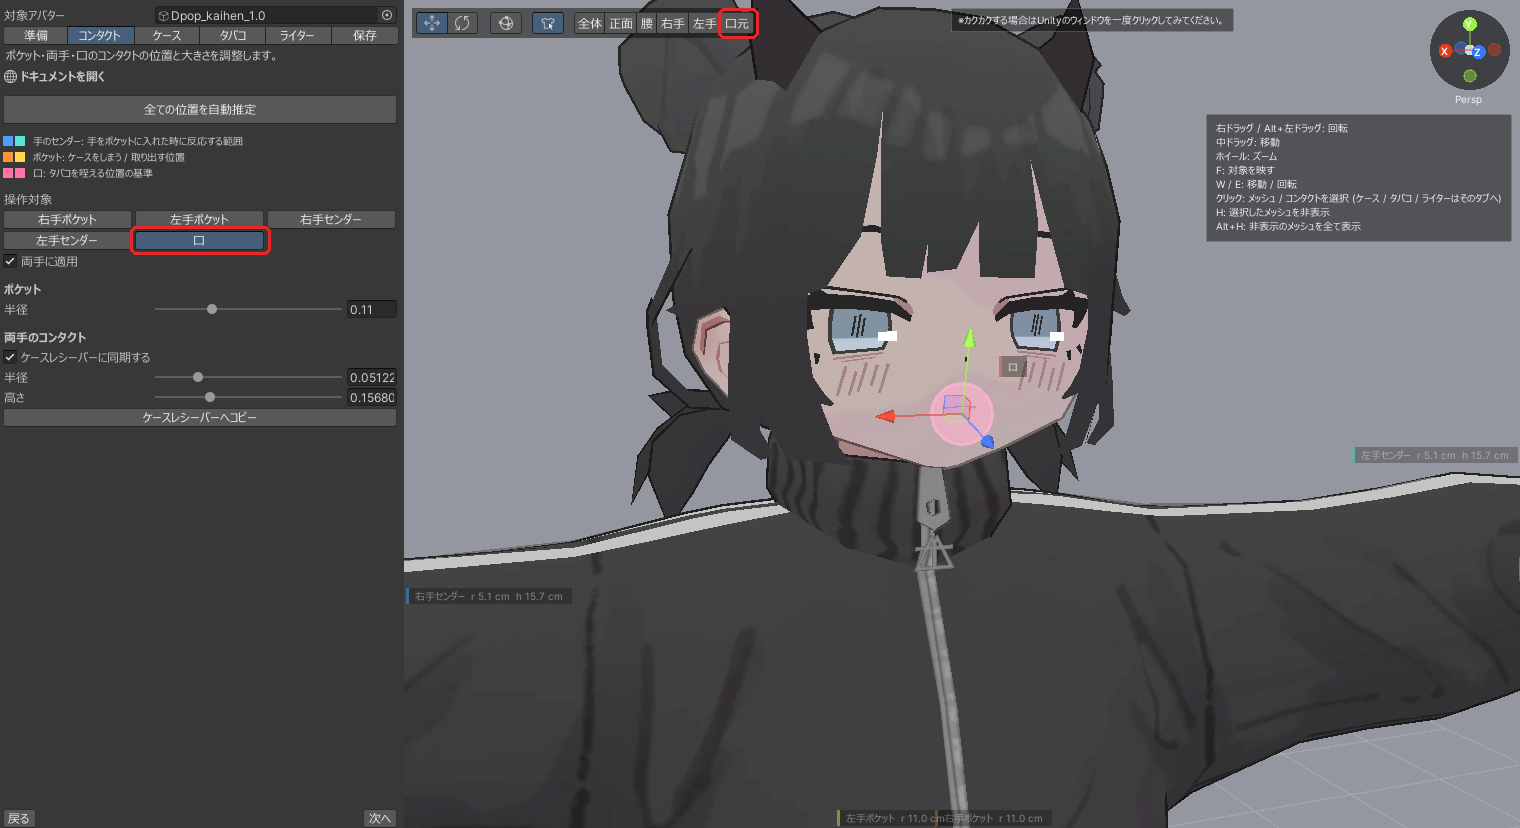
Select 口 (Mouth) under Handle Target and the camera moves to the mouth. (If it doesn't, press Mouth.)
Move it so that it sits slightly in front of the mouth. The mouth contact position doubles as the position the exhaled smoke comes from, so it's best to place it properly near the mouth.
Adjust the case
Open the Case tab. If Show Gesture is on, you can adjust with the hand posed as if holding the case. While Hide Other Objects is on, the cigarette and lighter are hidden. On the Case, Cigarette and Lighter tabs the preview avatar lowers its arms.
Make sure Handle Target is set to ケース_右手 (Case_Right hand). The camera moves to the right hand automatically. (If it doesn't, press Right Hand.)
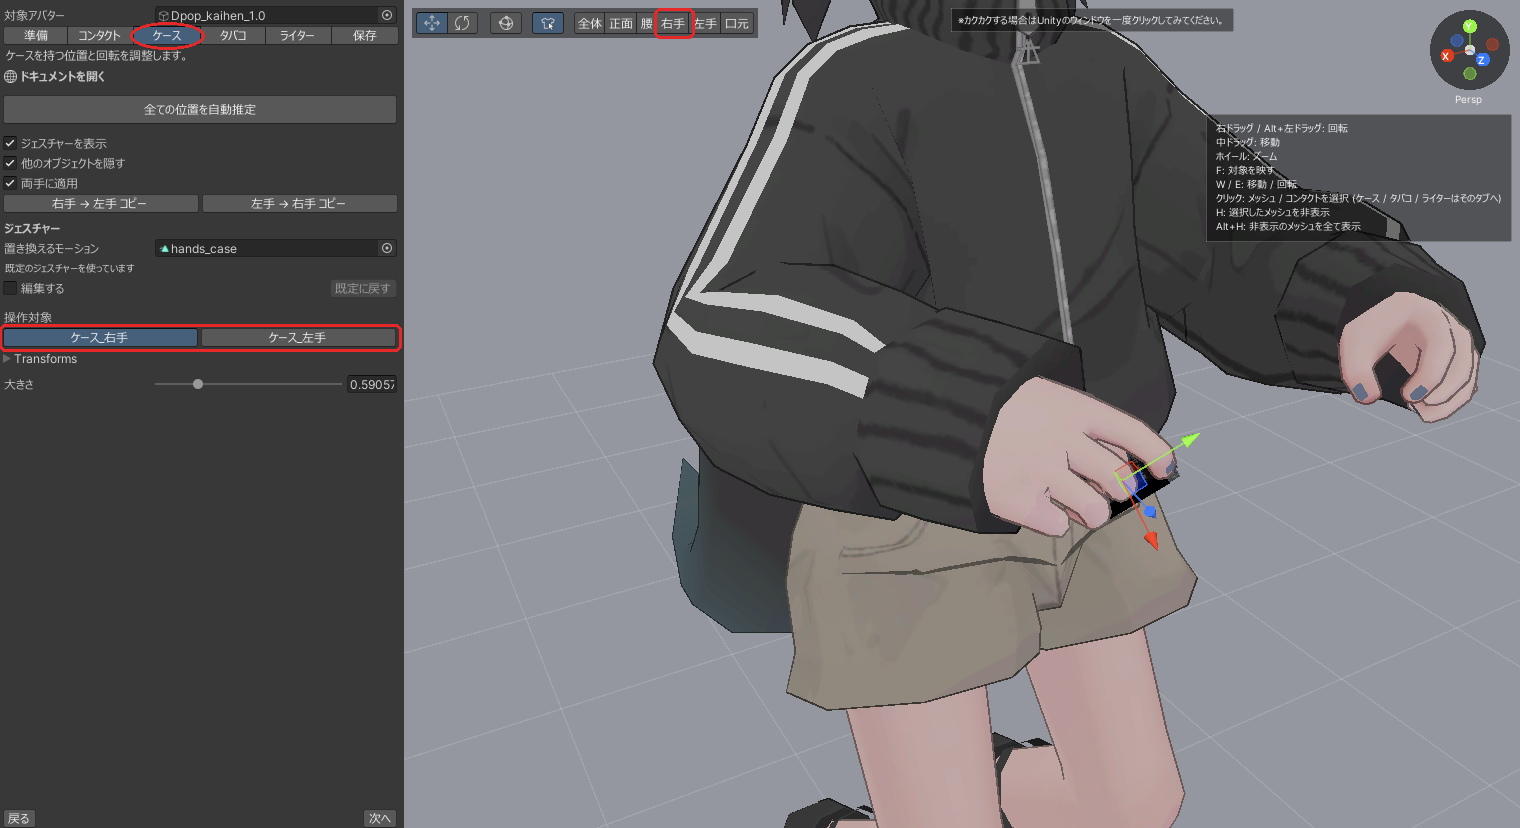
Drag the handles to move the case to where it fits snugly in the hand. To change its orientation, switch to the Rotate tool at the top left of the viewport (or press E).
If Apply to Both Hands is on, adjusting the right hand is mirrored onto the left hand too. (This setting is remembered separately from Apply to Both Hands on the Contacts tab.) If you adjusted only one hand with it off, Copy Right → Left copies it over.
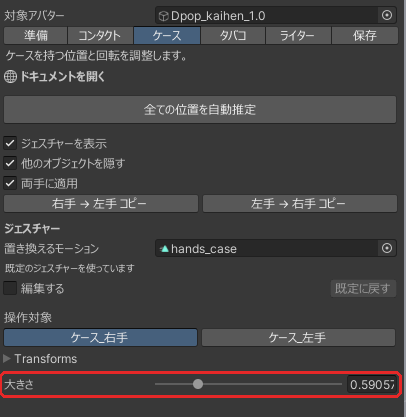
The case size can be changed with the Scale slider. (The cigarette shares its size with the case.)
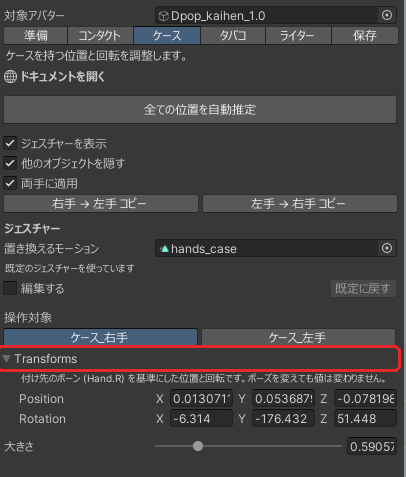
Want to enter the values as numbers?
In the Transforms section you can type in the position and rotation relative to the hand bone (if it's collapsed, click the heading to open it). The values don't change when the pose changes.
Change the hand pose (gesture) used when holding
To change how the hand is posed when holding the case, either put your own animation into Replacement Motion under Gesture, or turn on Edit and move the fingers directly in the tool.
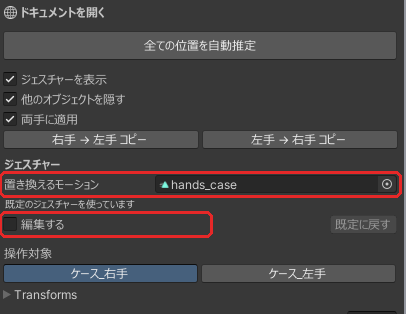
When Edit is on, dots appear on the finger joints in the viewport. Click a dot to select the joint, then drag the rings to adjust the bend (Stretched, blue) and the spread (Spread, green). The spread ring only appears on the base joint of each finger. The Stretched / Spread sliders on the panel change the same values.
If Apply to Other Hand is on, the same joint on the other hand gets the same values. Gesture edits can't be undone with Ctrl + Z, so press Reset to Default if you want to start over. (This also removes any animation you put into Replacement Motion and goes back to the bundled motion.)
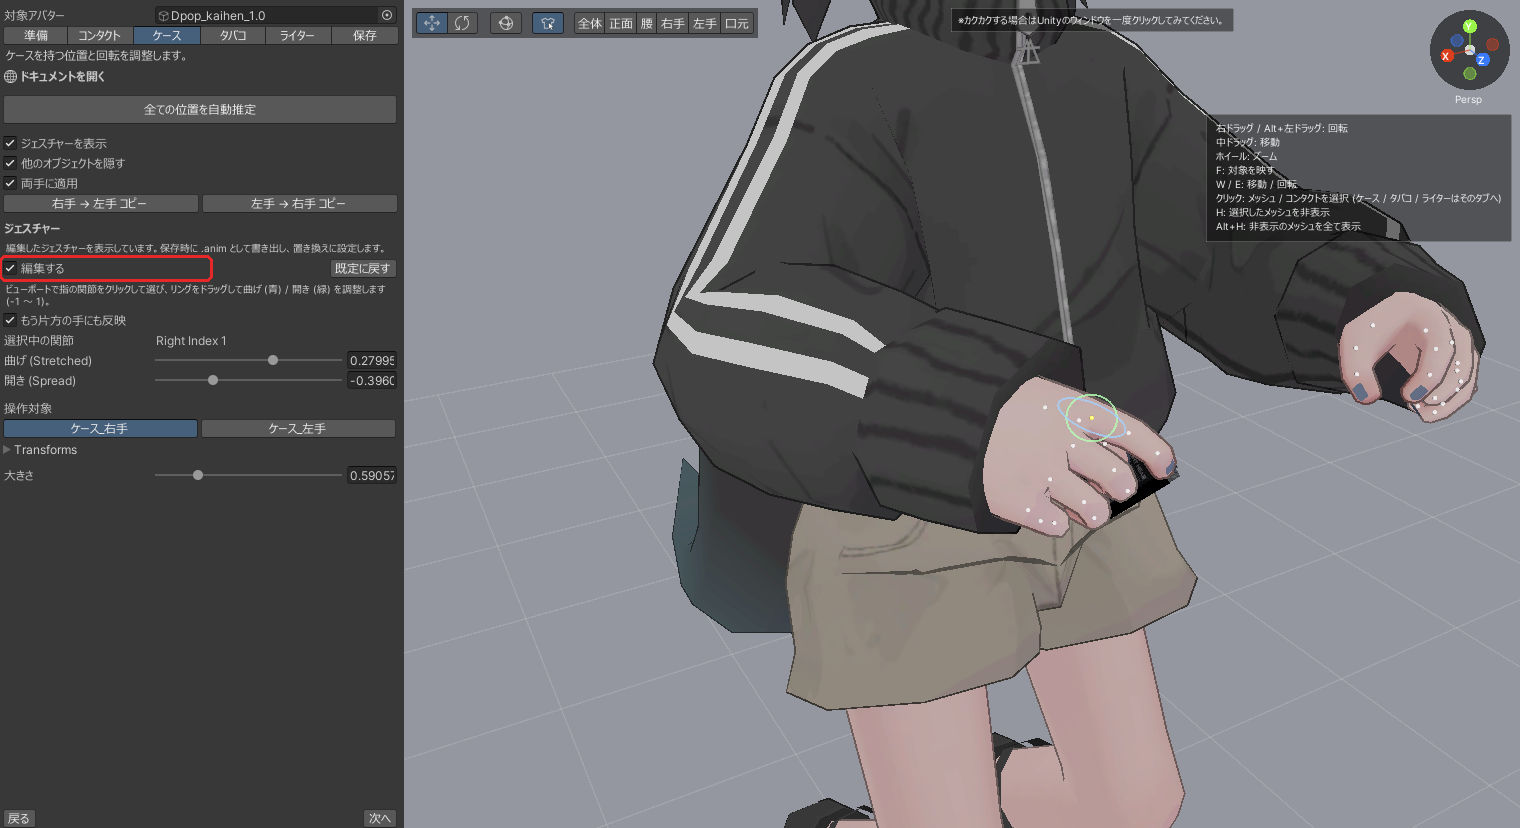
Edited gestures are written out as animations when you save and are set as the replacement automatically. The Cigarette and Lighter tabs have the same Gesture section, so the hand pose for holding the cigarette or lighter can be changed the same way.
The case position can't be changed while Edit is on, so turn it off again before adjusting.
Adjust the cigarette
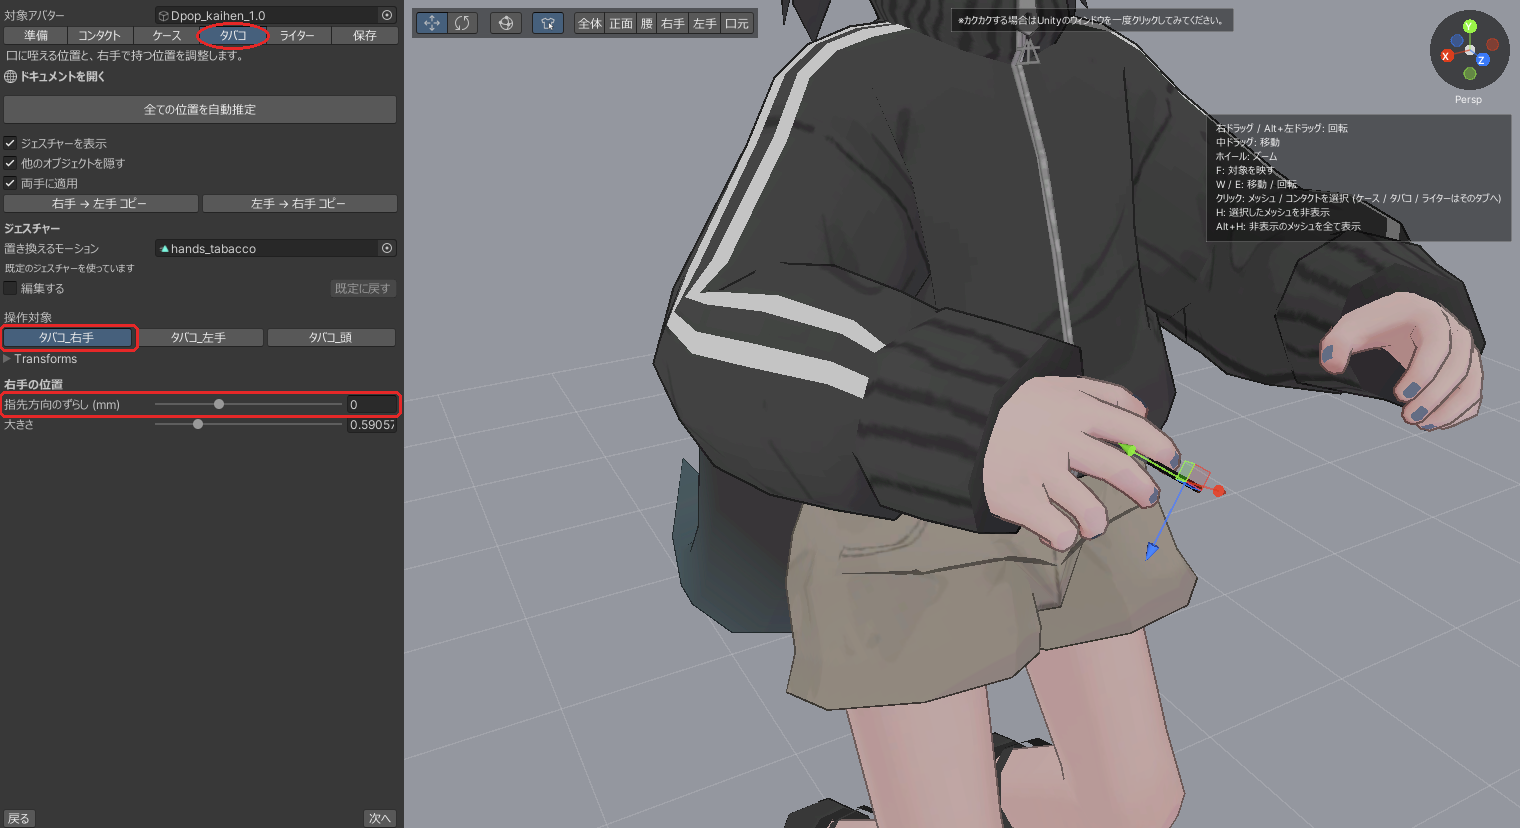
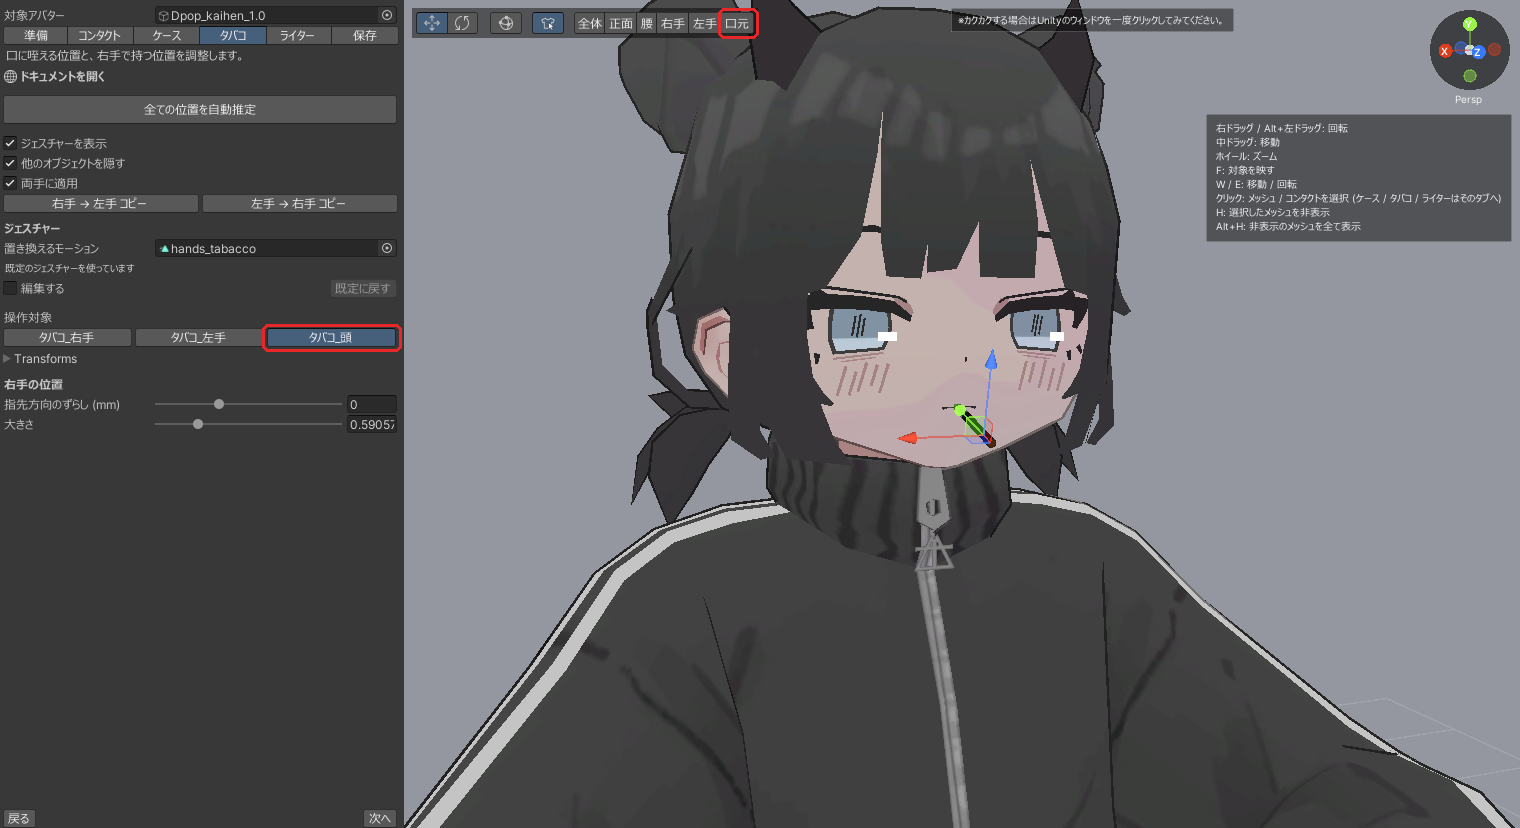
Open the Cigarette tab. Handle Target has three entries: タバコ_右手 (Cigarette_Right hand, the position held in the hand), タバコ_左手 (Cigarette_Left hand) and タバコ_頭 (Cigarette_Head, the position in the mouth). If Apply to Both Hands is on, the left hand is derived from the right hand automatically, so you only adjust two of them: the right hand and the head.
Adjust the position in the hand
It's a good idea to press Auto-estimate all positions on this tab once first. The estimate on the Setup tab was calculated from the mouth contact before you fixed it, so this recalculates タバコ_頭 from the corrected mouth position.
Along-finger offset (mm) under Right Hand Position is also a parameter of the auto estimation. Changing the value alone doesn't move anything, so press Auto-estimate all positions after changing it. The position is re-estimated shifted along the direction of the fingertips (this only works on avatars that have both the index and middle finger bones).
Once the estimate is done, select タバコ_右手 under Handle Target and use the handles to put it between the fingers.
Adjust the position in the mouth
Select タバコ_頭 under Handle Target and the preview cigarette moves to the mouth, with the camera following it. (If it doesn't, press Mouth.) Adjust the position and orientation so that it looks like it's held in the mouth.
Adjust the lighter
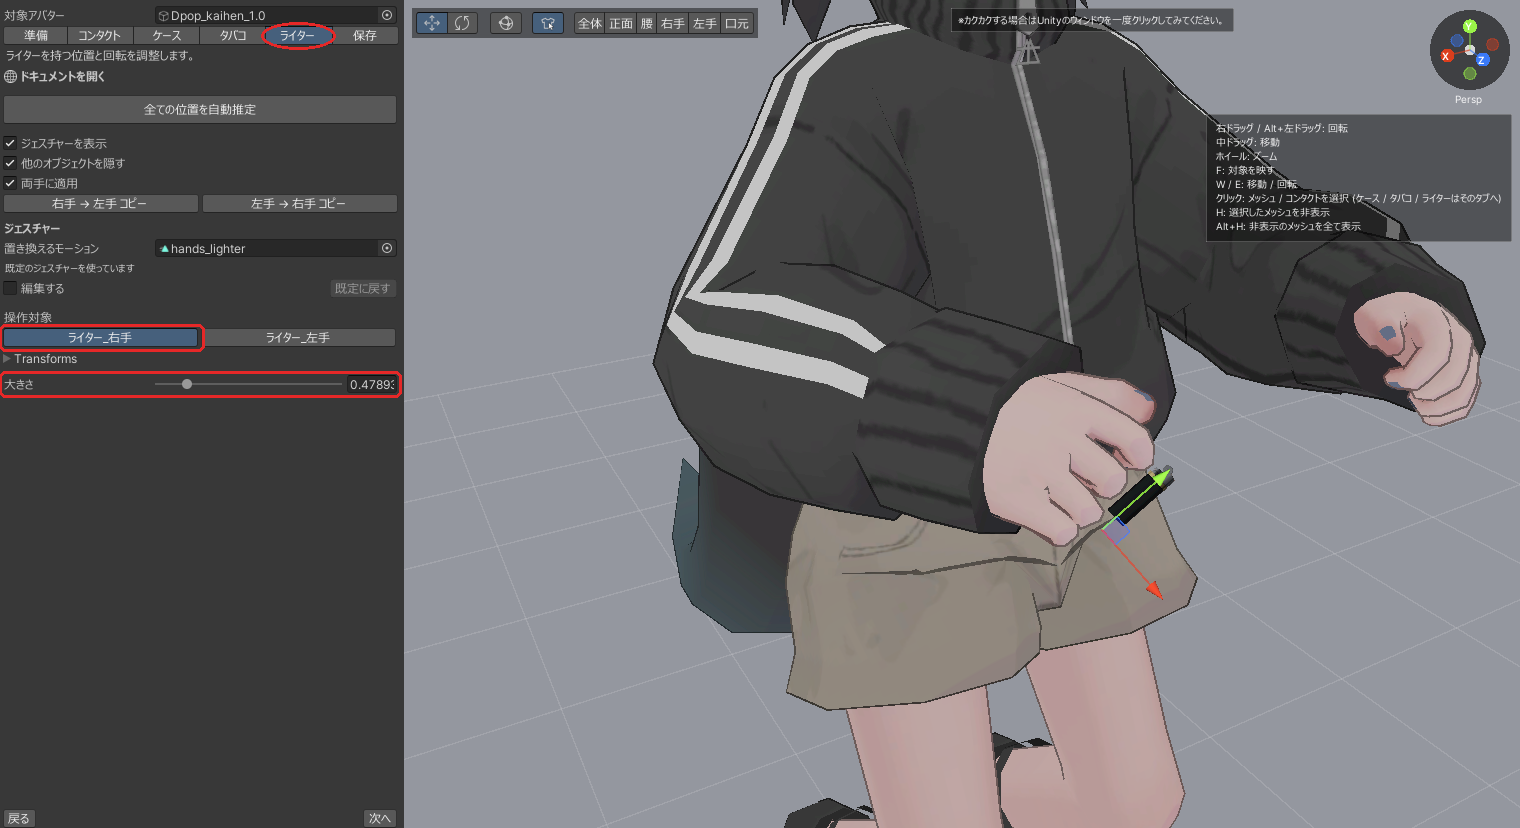
Open the Lighter tab. It works the same as the case: select ライター_右手 (Lighter_Right hand) and adjust the position and orientation with the handles (the Apply to Both Hands and Gesture sections are the same as for the case). It looks best when the thumb rests on the lighter's switch.
The size can be changed with the Scale slider.
Save
Open the Save tab. Prefab Name is pre-filled with the avatar's name, so change it if you need to.
Press Save and Add to Avatar and a dialog asks where to save. Saving writes your adjustments as a Prefab Variant and puts it into the avatar. This is the only time the avatar itself is changed.
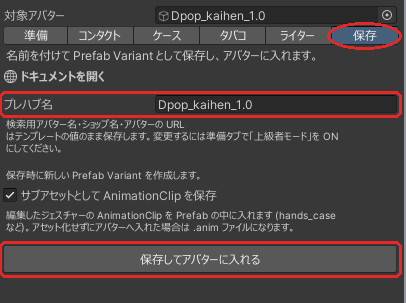
That's it. Nice work!
If you want to fix something after saving, press Adjust Again to continue adjusting from the saved values. In that case the next save behaves as described below in "What if the avatar already has a Prefab Variant made with the tool?".
What if the avatar already has a Prefab Variant made with the tool?
The Setup and Save tabs show "The existing Prefab Variant will be updated when saving." In this case no dialog appears, and pressing Save and Add to Avatar overwrites that Prefab Variant.
If the avatar contains one of the prefabs bundled with Satania Tabako, a warning starting with "This is a bundled prefab." appears. Bundled prefabs get overwritten when the package is updated, so give it a different name in the save dialog.
What is "Save AnimationClips as sub-assets"?
When you've edited a gesture, this chooses whether its animation goes inside the Prefab (as a sub-asset) or is saved as a .anim file in the same folder as the Prefab. Normally you can leave it on.
What if I cancel the save dialog?
No Prefab Variant is created, but your adjustments stay inside the avatar. You can save it later by dragging the prefab from the Hierarchy into the Project window and choosing Prefab Variant in the dialog that appears. If you edited a gesture, its animation is saved as a .anim file under Assets/SataniaTabakoGestures/<avatar name>/.
The rest is extra information for those who need it.
Notes
- ・In the Satania Tabako Prefab field you can use a different prefab (one with replaced models, for example) as the template. Swapping it replaces the case, cigarette, lighter and contact positions and the gestures with that prefab's values, and this can't be undone with Ctrl + Z. Swap it before you start adjusting.
- ・Closing the tool window, changing Target Avatar, a script compile or entering Play Mode all end the preview, and unsaved adjustments are lost. Don't forget to save when you're done.
- ・If you pick an avatar that already has Satania Tabako in it, adjusting starts from those values. If it has two or more, "Multiple Satania Tabako instances were found. Keep only one." appears and you can't continue, so reduce it to one before selecting the avatar.
- ・If you put a Prefab asset from the Project window into Target Avatar instead of an avatar in the scene, the button becomes Save and only the Prefab Variant is saved; nothing is placed in the scene.
- ・Meshes hidden with H are remembered while the same avatar is the target, and stay hidden when you resume with Adjust Again. Alt + H brings them back.
- ・If "Some finger bones are missing, so auto estimation will be less accurate." appears, fix the estimated result by hand.
- ・If "VRC Constraints are not executed in Edit Mode" appears, enable Edit Mode execution of constraints in the Settings of the VRChat SDK window. The tool's preview works even with this setting off, but it stops the saved avatar's objects from following in the Scene view.
- ・If the tool window is floating (undocked) and the view feels choppy, click Unity's main window once or dock the window into the main window.
There are a lot of fiddly steps, so I recommend following along with the video as you work.
Before you start adjusting
It's easier to adjust when you can see the Gizmos, so turn Gizmos on.
If you're using AAO: Trace And Optimize from anatawa12's AvatarOptimizer, remove it before you start.
(It can delete objects we need. You can put Trace And Optimize back on once you're done.)
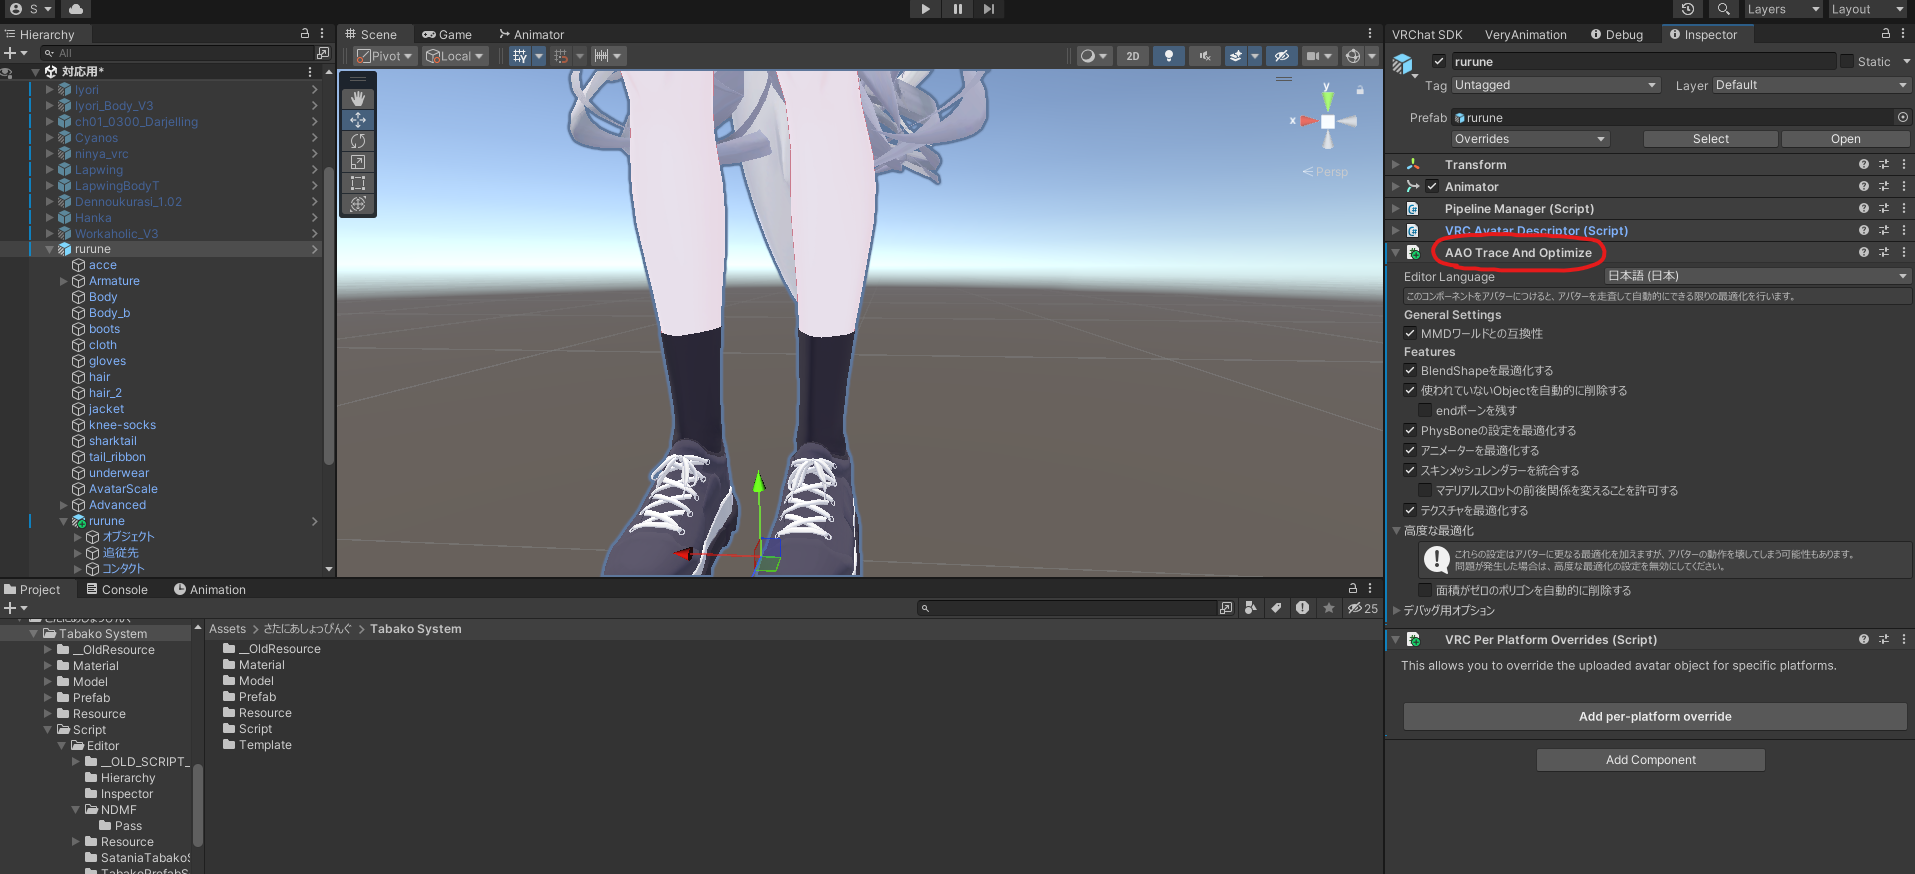
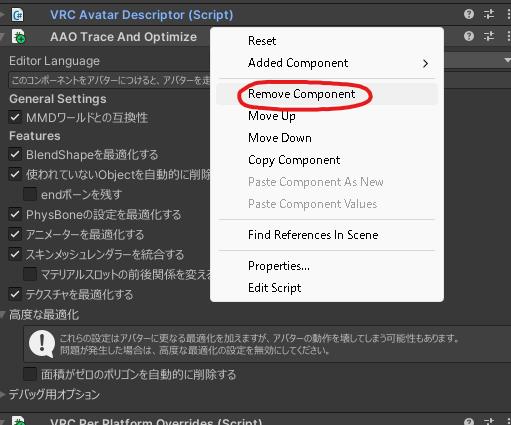
You can remove it with a right-click.
Adding the template
Put さたにあしょっぴんぐ (SataniaShopping) → Tabako System → Template → アバター対応用 (For avatar support) into the avatar you want to make compatible.
Adjusting the contacts
Adjusting the pocket position and size
Change the position of the pocket you put your hand into. Around belly-button height, and a little in front of the body's center for depth, is about right.
Sideways, put it wherever you like. (In the video I moved it in a little.)
Once one pocket is done, copy the values over to the other pocket.
Adjusting the contacts on both hands
Adjust the position and direction.
Make the direction parallel to the palm, and shift the position toward the palm side.
If you want to change the size, adjust Radius and Height.
Copying the hand contact settings to the case receivers
Copy the direction and position you set in Adjusting the contacts on both hands to the case receivers.
Use Copy ContactBase Shapes and Paste ContactBase Shapes for this.
Right-click the VRC Contact Sender and copy and paste like in the video.
Paste Right hand sender onto Right hand case receiver,
and Left hand sender onto Left hand case receiver.
Copy ContactBase Shapes copies, Paste ContactBase Shapes pastes.
All that matters is that they end up the same shape as the hand contacts, so you can skip the copying and adjust them by hand if you like.
Adjusting the mouth contact
Adjust the position of the contact used for holding the cigarette in your mouth and so on.
Select 追従先 (Follow targets) → 口 (Mouth) and move it to roughly just in front of the avatar's mouth.
Adjusting the case position
Hiding the cigarette and lighter before you start keeps the models from overlapping, which makes adjusting easier.
First, enter Play Mode, since we want to adjust with the gesture applied.
Apply the case hand gesture.
Right-click the avatar and select さたにあ式タバコ (Satania Tabako) → ハンドジェスチャー(ケース) (Hand gesture: Case).
Select オブジェクト (Objects) → ケース (Case) and click ケース_右手 (Case_Right hand) in the Inspector.
ケース_右手 then gets highlighted in the Hierarchy, so select it and adjust the position and rotation.
As I'll explain later, adjusting the right hand adjusts the left hand automatically, so you don't need to do the left hand.
(If it doesn't get adjusted, you'll need to set the position and rotation by hand.)
Want to change the case size?
Change the size of ケース追従先 (Case follow target) and it'll be reflected.
If you're going to adjust the cigarette and lighter positions next, stay in Play Mode.
Adjusting the cigarette position
If you changed the case size
The cigarette should be the same size as the case, so copy the size of ケース追従先 into タバコ追従先 (Cigarette follow target).
Right-click around where the video shows and you can copy / paste it.
Hiding the case and lighter before you start keeps the models from overlapping, which makes adjusting easier.
Apply the cigarette hand gesture.
Right-click the avatar and select さたにあ式タバコ → ハンドジェスチャー(タバコ) (Hand gesture: Cigarette).
Adjusting where it sits in the mouth
Select オブジェクト → タバコ (Cigarette) and change the constraint weights.
We're adjusting the cigarette while it's in the mouth, so set the weight of タバコ_右手 (Cigarette_Right hand) to 0 and the weight of タバコ_頭 (Cigarette_Head) to 1.
Click タバコ_頭 in the Inspector and タバコ_頭 gets highlighted in the Hierarchy. Select it and adjust the position and rotation.
Adjusting the right hand position
Put the constraint weights you changed in Adjusting where it sits in the mouth back to the right hand.
(Once it's no longer in the mouth, you're good.)
Click タバコ_右手 in the Inspector and タバコ_右手 gets highlighted in the Hierarchy. Select it and adjust the position and rotation.
If you're going to adjust the lighter position next, stay in Play Mode.
Adjusting the lighter position
Hiding the case and cigarette before you start keeps the models from overlapping, which makes adjusting easier.
Apply the lighter hand gesture.
Right-click the avatar and select さたにあ式タバコ → ハンドジェスチャー(ライター) (Hand gesture: Lighter).
Select オブジェクト → ライター (Lighter) and click ライター_右手 (Lighter_Right hand) in the Inspector.
ライター_右手 then gets highlighted in the Hierarchy, so select it and adjust the position and rotation.
Want to change the lighter size?
Change the size of ライター追従先 (Lighter follow target) and it'll be reflected.
Stay in Play Mode.
Saving your adjusted values to the prefab
Right-click the avatar and click
さたにあ式タバコ →
アバター対応用 →
ケース・タバコ・ライターの情報をコピー (Copy case / cigarette / lighter info).
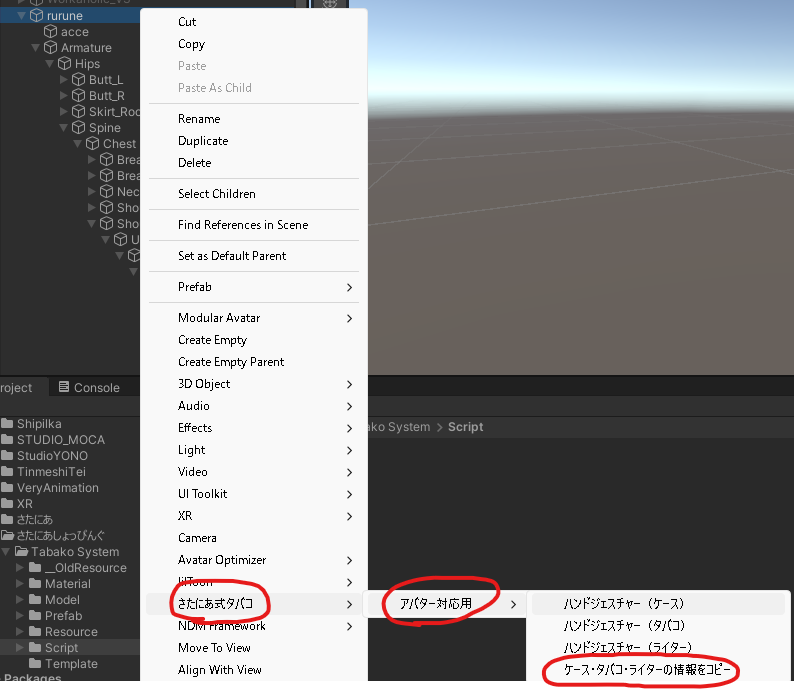
Once it's copied, exit Play Mode.
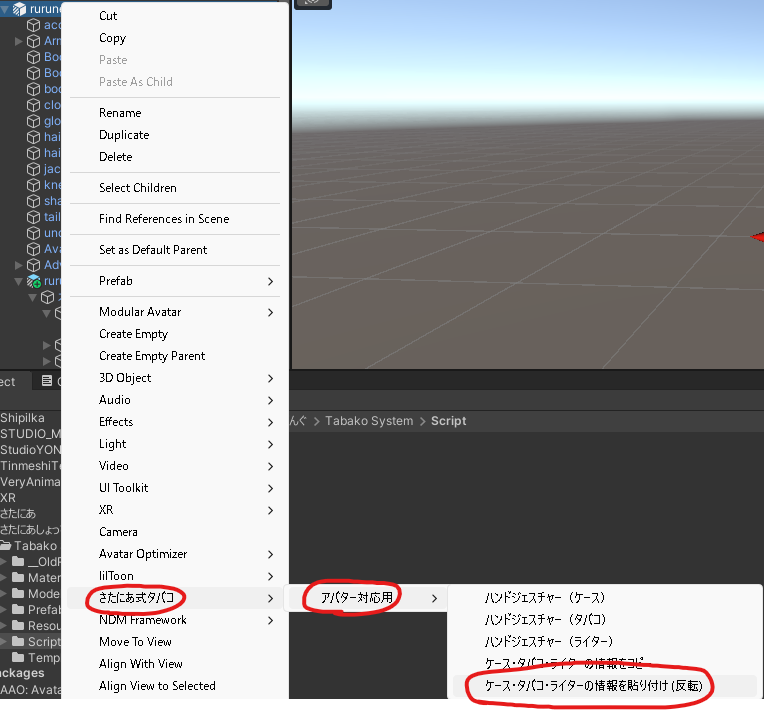
Right-click the avatar and click さたにあ式タバコ → アバター対応用 → ケース・タバコ・ライターの情報を貼り付け (反転) (Paste case / cigarette / lighter info (mirrored)).
As the (mirrored) in the name suggests, this takes the right hand's info and pastes a mirrored copy onto the left hand too.
Wrapping up
Rename アバター対応用 to your avatar's name, save it as a Prefab Variant, and you're done.
Nice work, you made it!